Leads CRM: get started
All your leads from Facebook / Instagram, Google Ads and your own website in one place — share them with agents automatically and track every lead. Click 🎯 Leads at the top of the sidebar.
- At the top of the sidebar there is a 💬 WhatsApp / 🎯 Leads switch — click Leads.
- In Lead Sources, connect your source: Facebook / Instagram, Google Ads or a Website form (see the next chapters).
- Add your agents in Add Members and use Distribution to decide which form’s leads go to which team / agent.
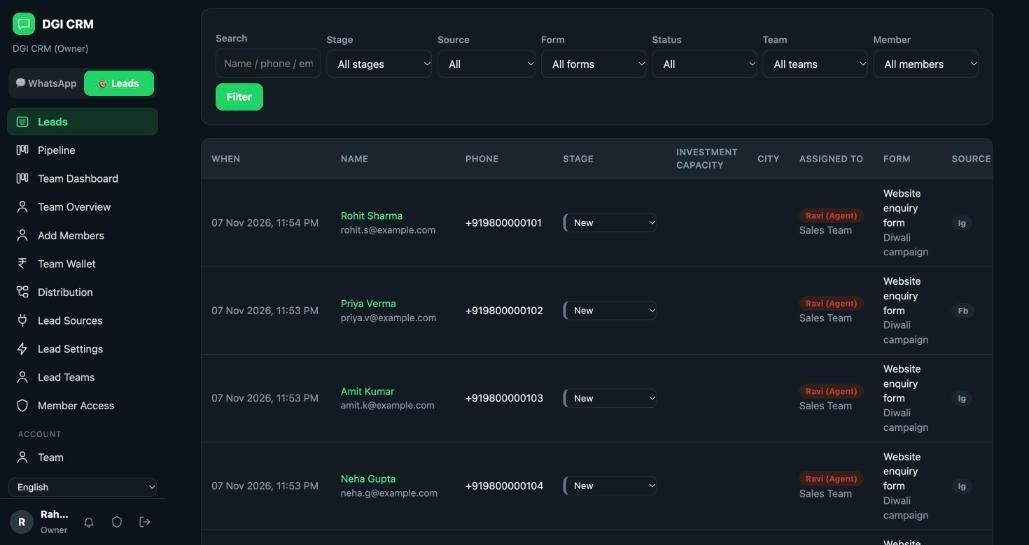
- All leads appear on the Leads page — filter by Stage, Source (Meta / Google / Website), Form, Team and Member.
- Update the stage of every lead, add notes and follow-ups — the dashboard shows your conversion.
Leads from Facebook / Instagram (Meta) Instant Forms
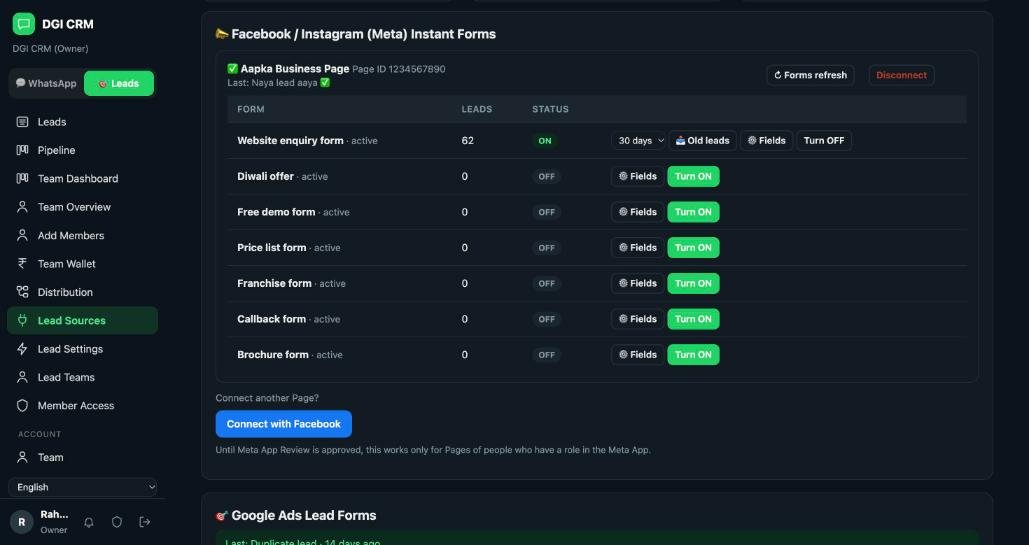
As soon as someone fills your Meta ad’s Instant Form, the lead reaches the CRM in seconds — Leads → Lead Sources.
- Open Leads → Lead Sources and click Connect with Facebook.
- Log in to Facebook, choose your Page and Allow all permissions.
- All Instant Forms of the Page appear in the list. Click Turn ON next to the form your ad uses — leads come only from forms that are ON.
- In ⚙️ Fields, map the form’s questions (e.g. city, budget) to CRM fields.
- Need earlier leads? Pick the days next to the form (e.g. 30 days) and click 📥 Old leads.
- Created a new form in your ad? Click ↻ Forms refresh.
Leads from Google Ads Lead Forms
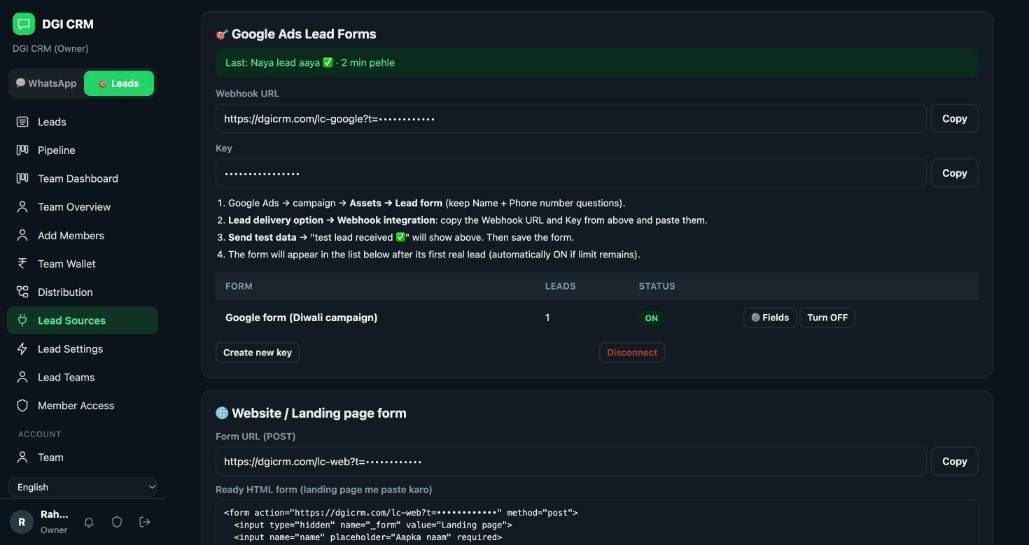
Leads from Google Search / YouTube / Display lead forms go straight into the CRM — Leads → Lead Sources → Google Ads Lead Forms.
- In Lead Sources, click Connect Google — your Webhook URL and Key are created.
- In Google Ads, open campaign → Assets → Lead form (keep the Name and Phone number questions).
- Under Lead delivery option → Webhook integration, paste the Webhook URL and Key copied from the CRM.
- Click Send test data — the CRM shows “test lead received ✅”. Then save the form.
- The form appears in the list after its first real lead (turned ON automatically if your limit allows).
Leads from your Website / Landing page form
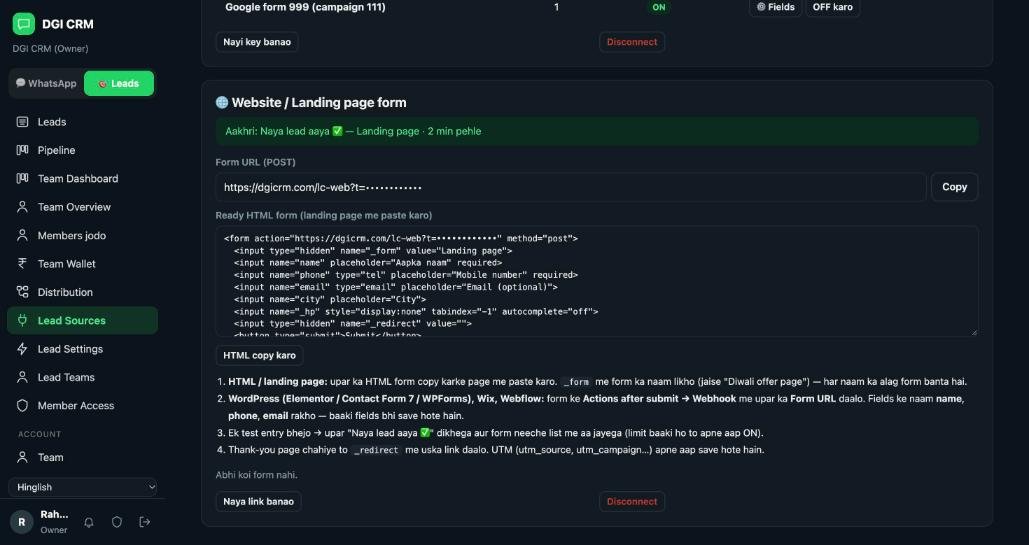
Leads from the form on your website or landing page go straight into the CRM — plain HTML, WordPress / Elementor, Wix, Webflow, anything. Leads → Lead Sources → Website / Landing page form.
- In Lead Sources, click Connect website form — your Form URL and a ready HTML form are created.
- HTML / landing page: click Copy HTML and paste it into your page. Put the form name in
_form(e.g. “Diwali offer page”) — each name becomes a separate form. - WordPress (Elementor / Contact Form 7 / WPForms), Wix, Webflow: put the Form URL in the form’s Actions after submit → Webhook. Name the fields name, phone, email — other fields (city, message…) are saved too.
- Want a thank-you page? Put its link in
_redirect. UTM values (utm_source, utm_campaign…) are saved with the lead automatically. - Send one test entry — Lead Sources shows “New lead received ✅” and the form appears in the list.
Add agents and distribute leads
Every new lead goes to the right agent automatically — with round robin, quotas and rules. Add Members, Lead Teams and Distribution.
- In Add Members, enter the agent’s name and email — a login ID and password are created. Or send a join link and approve the request.
- In Lead Teams, create a team and add agents to it.
- In Distribution, link each form to a team — leads go to the team’s agents in turn (round robin).
- On Growth / Scale: daily quota, night queue and routing rules (a different team by campaign / page / city).
- Each agent should Allow notifications from the 🔔 at the top of the CRM — they get an alert on phone / browser for every new lead.
- Leads
- Pipeline
- Team Dashboard
- Team Overview
- Add Members
- Team Wallet
- Distribution
- Lead Sources
- Lead Settings
- Lead Teams
- Member Access
Working a lead: stage, notes, follow-up
Every lead’s journey — from New to Full payment — on the Leads page.
- Click a lead in Leads — you see all form answers, source, campaign and page.
- Change the Stage (New → Called → Interested → Meeting / Demo → Token received → Full payment, or Not interested / Junk).
- Write notes and set a follow-up date — overdue follow-ups show on the dashboard.
- Use the filters at the top: Stage, Source (Meta / Google / Website), Form, Status, Team, Member.
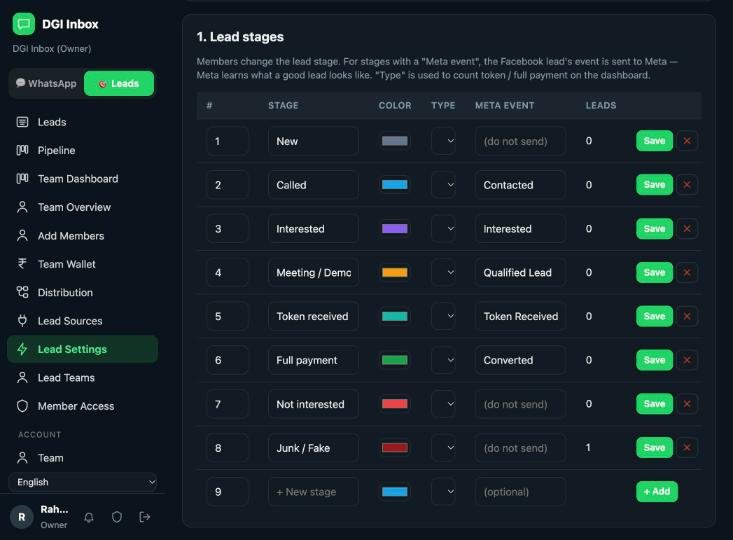
- Create your own stages in Lead Settings → 1. Lead stages (name, color, type).
Leads: Meta Conversions API (better leads, lower cost)
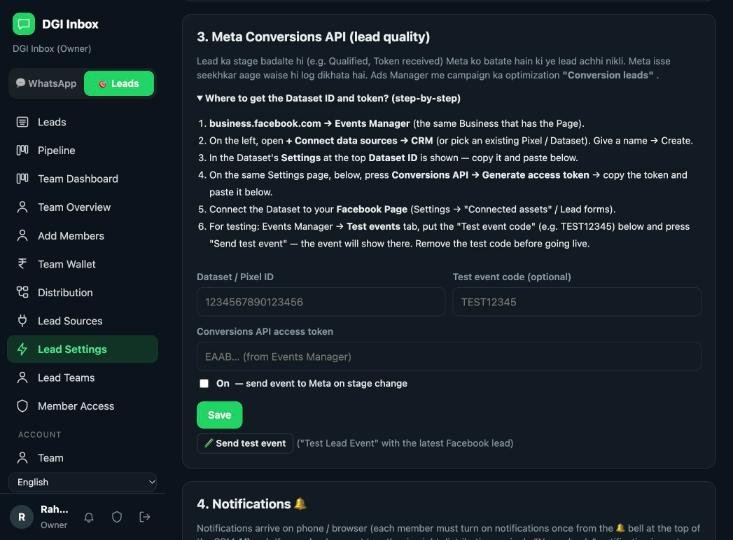
When an agent changes a lead’s stage (e.g. Qualified or Converted), the CRM tells Meta this was a good lead — Meta then finds more people like that. It is in Leads → Lead Settings (Lead Scale plan).
- Open business.facebook.com → Events Manager (the same Business that owns your Facebook Page).
- On the left, choose + Connect data sources → CRM (or an existing Pixel / Dataset), give it a name and click Create.
- In the Dataset’s Settings, copy the Dataset ID at the top. Lower on the same page, click Conversions API → Generate access token and copy the token.
- Connect the Dataset to your Facebook Page (Settings → Connected assets / Lead forms).
- In the CRM, open Leads → Lead Settings → 3. Meta Conversions API — paste the Dataset ID and token, tick On and click Save.
- On the same page, in the 1. Lead stages table, type a Meta event next to the stages that mean a good lead (e.g. Qualified Lead, Token Received, Converted). Leave Not interested / Junk empty, then click Save on each row.
- Test: copy the code from Events Manager → Test events (e.g. TEST12345) into the CRM’s Test event code box, save and click 🧪 Send test event. When the event shows in Events Manager, remove the test code and save again.
- In Ads Manager, set your lead campaign’s optimization to Conversion leads — Meta now learns from your CRM’s events.
Agency mode (Lead Scale): a separate team, leads and balance for every client
Running a digital marketing agency? Make each client a Team — their leads, agents and balance stay separate, and you see everything in one place.
- In Lead Teams, create one Team per client (e.g. “Sharma Builders”).
- Add the client’s agents to that team (Add Members) — they see only their own leads.
- In Distribution, link the client’s form to their team.
- Keep a balance for each team in Team Wallet — the cost per lead (CPL) is deducted for every lead. When the balance runs out, new leads go on Hold and move on as soon as you recharge.
- Team Overview shows all clients in one place: leads, balance, token / full payment and conversion.
- Use your own words: in Lead Teams → Structure names, rename Team → “Client”, Agent → “Executive” and so on. In Member Access, decide what each agent can see.
- Leads
- Pipeline
- Team Dashboard
- Team Overview
- Add Members
- Team Wallet
- Distribution
- Lead Sources
- Lead Settings
- Lead Teams
- Member Access
Common problems and fixes
Why is a lead on "Hold" or 🔒 locked?
The form is OFF, this month’s lead limit of your plan is used up, or (on Lead Scale) the team’s wallet has no balance. Turn the form ON / upgrade the plan / recharge the wallet — held leads move on automatically.
My Page does not show when connecting Facebook?
You must be an admin of that Page and allow all permissions in the Facebook login. Click Connect with Facebook again and tick all Pages.
The Google Ads test lead is not arriving?
Copy the Webhook URL and Key again and paste them (no spaces before or after). Any error shows in the "Last" status on Lead Sources.
I submitted the website form but no lead arrived?
The phone field must be named phone / mobile / whatsapp and the number must have at least 8 digits. Check the "Last" status on the Website card in Lead Sources.
Why did I get two leads from the same person?
Entries on a different form or on a different day are both saved. The same number on the same form on the same day is a duplicate and is not created again.
Need help?
Write to the email / WhatsApp on the Contact page — please mention your registered email.